Pakk-Hungama Headline Animator

Friday 30 September 2011

Linking Your Blog and Social Media Marketing(SMM) Accounts


Your blog and your social media marketing (SMM) accounts should be linked together. You want to create a network of resources that bring together your various marketing efforts. Linking your blog to your social media accounts is essential.

Blog Postings on Facebook and Twitter

You can set up your social media accounts including Facebook and Twitter so that they automatically show a link to your blog postings. This automated technique makes it easy to update your Facebook pages and Twitter account with your new blog postings.

One of the goals of all social media marketing plans is to keep content updated and fresh. If you update your blog frequently you will be automatically updating your Facebook and Twitter account as well.

Make sure the titles of your blog posting are eye-catching and you can drive traffic from the social media sites onto your blog. A short, catchy title will capture the attention of someone you are friends with on Facebook or who is following you on Twitter.

Add Social Media Links to Blog

People who find your blog may not know that you also have social media accounts and pages. Make sure that your blog prominently displays an invitation for them to become a fan on Facebook and a follower on Twitter.

As a blogger you want to give people a ample opportunity to learn more from you and about you. Linking your social media accounts to your blog creates these opportunities.

Web 2.0 is all about users participating on websites and networks. A blogger needs to think about inviting participation on their blog and beyond their blog in order to create an overall user experience that builds loyalty.

Top Mistakes of Bloggers

Knowing the most common mistakes made by bloggers can help you avoid making them. In the end you have complete control over your blog. You can choose to do or not to do anything you want. Knowing the repercussions of certain actions or inactions can help you make better decisions.

Blogger Mistake #1 – Ignoring Comments

Ignoring the comments posted on your blog is a big mistake. Some bloggers never read the comments posted on their blog. This is bad for two reasons. First, you will gain no insight about your followers. Your followers are essential if you want to have a popular blog or a blog that you earn money from.
Think of your blog as a conversation not as a monologue. Never ignore your readers. If you ignore them they will eventually ignore you.

Additionally, the comments section is where most SPAM will appear. Even if you install SPAM blockers there will be a certain amount of SPAM that is able to make its way through. SPAM can hurt your blog’s reputation and even cause problems on Google and the other search engines.

Blogger Mistake #2 – Infrequent Posting

Infrequent or irregular posting on your blog can lead to you losing followers. Even if you do not think anyone is reading your blog you want to set a schedule for blog postings and stick to it. It is important to have consistency on a blog, especially if it is a corporate blog or a blog intending to create revenue.

Depending on the focus of your blog you will need to determine the minimum frequency you can post on it. Some blogs can do quite fine with 3 or 4 blog posts per week while other blogs need 10 or more postings per day.

Your followers will start to expect to see postings regularly so do not disappoint them.

Blogger Mistake #3 – Taking Things Personally

Do not fall into the trap of taking criticism personally. You can expect to see your share of negative posts, perhaps even flaming (flaming is when someone viciously attacks another person online). Do not retaliate with a personal attack of your own. Simply delete the offending comment and move on.

These are the three biggest mistakes bloggers make. The key to succeeding with your blog is to review popular blogs and see what they do well. Try to focus on the positive aspects of blogging while keeping an eye out for common mistakes.


Tuesday 27 September 2011

Blogging – How Often?


You need to blog regularly. Depending on your goals you may have to put blog postings up daily or perhaps only weekly. You need to stay on top of your blog. If your blog readers see a lull in your postings they will lose interest.

A good rule of thumb is to post at least 4 times per week. Anything less than that would be ineffective for most purposes.

Ask yourself these questions and be honest and realistic with the answers and you will determine whether it is time to blog or not to blog.

To Blog or Not to Blog

To blog or not to blog that is the question website owners should ask. Many people rush to create a blog with little purpose in mind, and others assume blogging is a waste of time and never try.

The truth is that some businesses would benefit from a blog while some would not.

Blogging – Do You Have Something to Say?


The first question you should ask yourself is whether or not you have something to say that will either inform or entertain your target market. You need to feel confident that you can sustain a blog.

If you have “some” information but not enough to sustain a blog you may consider writing and distributing articles rather than writing a blog.

If you think you have enough to say then you are past the first step in the decision making process.

Blogging – Identifying the Target Market


It is important to identify your target market. Who do you want reading your blog and for what purpose? This will help you start to determine whether or not this target market is likely to find and read your blog. You do not want to waste resources in writing a blog no one reads.

Determining the goal of your blog is vital. Is your goal to create a revenue stream through affiliate marketing? Is the goal to introduce consumers to products and services on your website? Is your goal to enhance your search engine rankings?

Once you know your goal or goals you can start to determine how likely it is for you to reach them. For example, will you be able to find affiliate advertisers who would appeal to your target market? Do you have enough information to post regularly about your products and services without being repetitive?

You need to know who your target market is and what your goal is.

Sunday 25 September 2011

How to Name Your Blog

Shakespeare asked if a rose by any other name would smell as sweet. The importance of choosing the right name for your blog should not be overlooked. Remember there are two different names for your blog. First, there is the name you choose for the actual blog. Second, there is the URL you reserve to host your blog.


Naming the Blog
People can sometimes try to be overly cute or a bit too creative when they name their blog. Though it is a way to show your creativity you run the risk of no one knowing what your blog is actually about.

A blog’s name should immediately convey the central purpose of your blog. This will be helpful in gaining followers who often look on blog directories or search for blogs by category online. If someone is looking for a blog about luxury handbags they will want to see a blog with a name that includes any of the following:


  •  Bags
  • Clutches
  •  Handbags
  •  Hobos
  •  Purses
  •  Satchels, etc

Though you may want to be more creative and use a term like arm candy, not all of your potential readers will be able to identify the focus of your blog based on the name.

Try to be straight forward with your blog’s name and use your creativity with the design of the blog and the actual content on it.

Blog URL
If possible you want your blog’s URL to be the same as the name of your blog but this is not always possible or even desirable. If you want to be creative with the name of your blog then try to be straight forward with your URL. For example, if you choose the name Eye Candy Blog for the name of your blog, as mentioned above, you may want a URL that has handbag or purse in the name.

Typically people see both the blog’s name and URL when looking in a blog directory. Though ideally you are straight-forward with the name you give your blog and the URL it will be placed on, you can choose to be a little more creative with the name of your blog as long as your URL contains the keywords in it.

Take time to think about the best name for your blog. Try to choose a name that will strike a chord with your target market. Often less is more and simple is the best way to go.

How to Set Up a Blogger Blog


Setting up a blog on Blogger is quite easy. The first thing you want to do is to set up a Google account for the blog. You can do this by going to Blogger.com and then following the link in the resources section.

It takes about 2 or 3 minutes to set up a Google account. If you already have a Google account you can use it if you wish.

After you have set up your Google account you should go back to Blogger.com and sign-in using your Google account username and password. Your username is typically the e-mail address you used when creating the account.

You can set up your account so it remembers your username and password. Only do this if you are on a non-shared computer.

Look for the “Create a blog” option on the dashboard of Blogger. The dashboard is the page you go to every time you log onto your Blogger account. You can manage several blogs from the same dashboard if they were all created with the same Google account.See in picture below:


You will be asked to name your blog. You want to create an easy to remember, easy to find name that makes it clear what your blog is about. Try not to have a blog name that is too long. It will be the first part of the web address of your blog. For example if you name your blog “pakk-hungama” your URL will be: http://pakk-hungama.blogspot.com

The next thing you need to do is to choose your template. Blogger has a number of templates to choose from. You do not have to agonize over which template to use because you can change the template at any time.

Write your first official blog post using the template Blogger provided. Feel free to add a picture, etc. Once you submit that first blog posting you will be able to view your new blog, edit the posting, etc.

At this point you can personalize your blog so it stands out. Many different aspects of the blog can be changed, moved around, etc. Click on the “Layout” option and start to make your blog stand out from the other blogs out there. You can undo virtually anything that you do so do not be shy to experiment with different layouts for your blog.

Once you finish your layout you are done. Happy blogging!

How to Set Up a WordPress Blog


Here’s how you set up your WordPress Blog on your URL (domain). The first thing you need to do is to make sure you have a hosting account created. Your hosting account must include:

  •  PHP 4.3 (or higher)
  •  MySQL 4.0 (or higher)
  •  Mod_rewrite Apache module

You do not need to worry about what these features are, it is just important that you make sure you have them. Try to get hosting at the same place you set up your domain.
In your hosting account you will find a control panel. In your control panel find the Databases option and create a new database. You will be asked to give the database a name and create a username and password. Keep this information in a safe place. This is your MySQL database that will store all of your blog postings.

Installing WordPress
Once you have the hosting set up and the database created it is time to install WordPress. Some hosting companies have a quick install option. If they do not all you have to do is download the latest software at: http://wordpress.org/latest.zip (for Windows or Mac).

Unzip the files on your computer. They will be unzipped in a folder called “Wordpress”.

Within the unzipped files you will find a file called wp-config-sample.php open it the file (it will open in any document editor). You will find instructions in this document. Change the text as needed in your editor (you will be adding the name of your database, username and password. Save the file and rename it “wp-config.php”.

Move each folder and file within the “wordpress” unzipped folder you created (do not copy the folder itself) onto your website host company’s server (your hosting company will give you directions, it is very easy).
If your blog is the entire site put it in the root directory. Otherwise you will want to create a subdirectory for the blog. You may want to create one like: http://www.mydomain.com/blog or blog.mydomain.com.

After the WordPress files are on the server go into your web browser and type www.yourdomain.com/wp-admin/install.php (or if you did it on a subdirectory you type www.yourdomain.com/blog/wp-admin/install.php.

The software will then guide you through the last few steps to installing your blog on your server. WordPress makes it quick and easy to install a blog. Take your time and go step-by-step and you should have no problem installing and starting your blog.

Wednesday 21 September 2011

Post Feed Redirected url

Many  people  get  confused  when they heard  about  Feed. Oh..! What is Feed..? What is  Feed redirected url..? How  i get  feed url..?? What is  advantage of  feed..? And  bla bla bla......!
Don't  worry  here are some  simple answers of  these  questions.

Actually  there are Two things:
1-One is that  we can  digest  easily.
2-And other is that  computer or your operating system can digest easily.

You  see your blog and is  very  easy for  you to digest. There is another copy of your blog  that is created  for computer  to digest. So your posts or  content of your  blog can be easily tracked  by other  blogs or  site. So here is another  benefit of  feed that it  is also a source of  targeted  traffic.
Actually in  feed your all  post are  written  in XML. So  that  computers  can  reach  to  your posts and process data  easily.

How to get Feed redirected url:

Here  are some  simple  steps to  get  feed redirected url.
1-Click on Setting  tab on  your  dashboard.
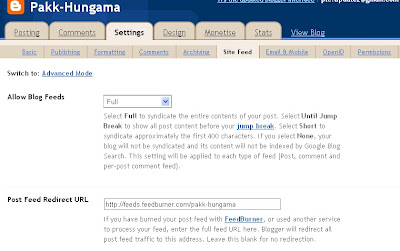
2-Under  Setting tab  click on  Site Feed. And following  window will open.

Post Feed Redirected url.

3-Click  on FeedBurner. And  login to  FeedBurner.
4-Enter  your  Blog name.
5-Click  Next. And then  again  click  Next.
6-Select   your  favourite  setting. Now  yor  Feed is  ready for  Web World.

Now in  "Post Feed  Redirected  url"  option, as you  can  see in above  picture. Type:
http://feeds.feedburner.com/Your_Blog_Name
And  save  Setting.

Tuesday 20 September 2011

How to Add Page Title in Blog

Always  always  design your  site or blog Search Engines  friendly. And everybody  wishes that  his site or  blog ranks  high in  Search Engines. Here are  some Tips that  how could  you  perform  this.

When we click on our  Blog  pages or posts one thing  you notice  that  always  blog tittle  appear on the  Tittle Head. However  if  we design  our  Blog  such that  it always show page Name in Tittle Head  then it will be  Search Engines  friendly. And  also  Search Engines can  find our posts  more frequently and also Ranks our blog on top.

So the  steps are  very  simple.
1-Click on  Design tab.

How to add Page Tittle in Blog.

2-Under Design tab  click on  Edit Html.
3-There  you will see  this  code

<title><data:blog.title/></title>

4-Replace this  code with the following code:


</b:if>
    <b:include data='blog' name='all-head-content'/>
    <b:if cond='data:blog.pageType == &quot;index&quot;'>
<title><data:blog.title/></title>
<b:else/>
<title><data:blog.pageName/></title>
</b:if>


5-Save  Template. Now  you are  Done.


If  You like this  post do  Comment below and also  Share it wit your  Friends.
Feel  Free to ask any  Question.

How to Split your Blog sidebar into Two Columns

Many  People  wants to add  more Gadgets  to their Blog. And to save space they often want to Split  Sidebar into  two columns  so they can add  more  gadgets  to their  blog. But they  don't know how to to  do this  job..:(
Don't worry  it is as simple  as to play  Pinbal game..:)

Follow these  simple steps.
1-Click  on Design/Layout  tab.

How to split sidebar of blog into two columns.

2-Under Design  tab click on  Template Designer.
3-Now  click on  Layout.  Following  windowill  appear.

How to split sidebar of blog into two columns.

4-Select  the Third  Layout which is mark as Tick. Or You can  select  any  Layout  that  you want.
5-Click on  Apply to blog  on top Right  and you are  Done..:)

You can also  Split  your right  sidebar into  two columns in the same  way. You  can also  split  bottom bar into Three columns.

If  You like this  post do  Comment below and also  Share it wit your  Friends.
Feel  Free to ask any  Question.

Wednesday 14 September 2011

Earn More with Adsense for Feeds


Adsense for feeds also helps also helps people to earn money by placing  Google ads in their feeds. Adsense for feeds works is same as the other  Adsense program are. Where you can deliver ads that are relevant to your content and your viewers.
As like other Adsense ads, feed ads can also be paid in 2 different ways.

1- Just by click.
2- Or just by impression.

Like other Adsense ads Feed ads can also be targeted in 2 different ways

1-Content in your feed is targeted contextually.
2-  Advertisers targeted your specific feed when you set up an ad placement.

As i have told that like Adsense for Content, ads in feed are also contextual in nature. So I am expecting nice revenue from this AdSense for Feeds program. I guess this will offset my 10% AdSense revenue loss due to retirement of Adsense referral for products program.
In  feeds  you  can control the positioning , appearance, and frequencyof Google ads.Size of  ad  is  determined automatically based on where your feed is appearing in blog.


But putting AdSense ads in feed will take time . Even Google brought FeedBurner, there is no automatic way to integrate AdSense and Feedburner. AdSense support team  done it manually.
According to my point of view bloggers with full text feeds will get more traffic because their posts will have more text to target.
Hope  you  start  thinking  on  making money  with Adsense for  feeds. Best of  Luck..:)

Earn Money Online With Alternatives of Adsense


Many Publishers get banned by Adsense. After getting banned they don't know the exact reason. Although many of them again apply for adsense but their reques often Diapproved. But you don't need to be worried.                                        
If  you ever been banned by Adsense and don't know what to do. Don't worry!!! There are huge number of adsense alternatives to earn money online available in this  world of web.If you want to do better with   something other than Adsense?
I have now collected the list and offering the same for the benefit of my visitors.Do you want to see whether you can do better with something other than Adsense?
Please do see the following list-

1. AllFeeds
2. Burst Media
3. Clickcent
4. AffiliateSensor
5. AdBrite
6. AzoogleAds
7. BidClix
8. Yahoo Publisher Network
9. Buds Media Network
10. Advertising.com
11. adagency1
12. ValueClick
13. Claxon
14. Kanoodle Bright Ads
15. Clicksor
16. ContextCash
17. TargetPoint
18. contextWeb ContextAd
19. Nixie
20. Enhance Interactive
21. Fastclick
22. Hurricane Digital Media
23. ContextClick
24. Mamma Media Solutions
25. MIVA AdRevenue Xpress
26.  Revenue Pilot
27. Quigo AdSonar
28. RealCast Media
29. RealTechNetwork
30. Vibrant Media IntelliTXT & SmartAds
31. Right Media
32. Searchfeed
33. Bidvertiser
34. Traffic Marketplace
35. Tribal Fusion
36. DynamiContext (Kontera)
37. Veoda
38. Chitika eMiniMalls

If anyone of you has experience  about any of these programs, please comment below so that other people can also know is it would be good to start earning from these sites.


Related Posts Plugin for WordPress, Blogger...